关于这个网站是怎么搭起来的
前言
谨以此文,详细介绍一下搭建这个博客的历程。
俗话说得好,不要重复造轮子。如果从头开始写html、css、js,然后找云服务器部署,时间成本、金钱成本都很高。使用现成的、开箱即用的框架,能够把文章扔进去就显示在网页上,是最理想的部署方案。
经过简单调研,选择部署方案如下:
- 静态网站,不用数据库
- 在github仓库上传代码,利用github自动部署
- Jekyll 框架
- Chirpy主题
环境准备
远程
github
本地环境配置(wsl)
apt 依赖项安装
1
sudo apt-get install ruby-full build-essential zlib1g-dev
为自己的用户账户配置gem的安装目录
1
2
3
4
echo '# Install Ruby Gems to ~/software/gems' >> ~/.bashrc
echo 'export GEM_HOME="$HOME/software/gems"' >> ~/.bashrc
echo 'export PATH="$HOME/software/gems/bin:$PATH"' >> ~/.bashrc
source ~/.bashrc
安装 Jekyll 和 Bundler
1
gem install jekyll bundler
ruby 换源
如果网络环境不好,可以换ruby的国内镜像源
1
bundle config mirror.https://rubygems.org https://gems.ruby-china.com
首次部署过程
1.在github上创建仓库
仓库名为<username>.github.io,把<username>替换为自己的用户名
2.建立本地仓库
从chirpy-starter仓库克隆模板:
1
git clone https://github.com/cotes2020/chirpy-starter
进入仓库,移除原有的远程库:
1
2
cd chirpy-starter/
git remote remove origin
添加自己的远程库:
1
2
3
git remote add origin https://github.com/<username>/<username>.github.io.git
git branch -M main
git push -u origin main
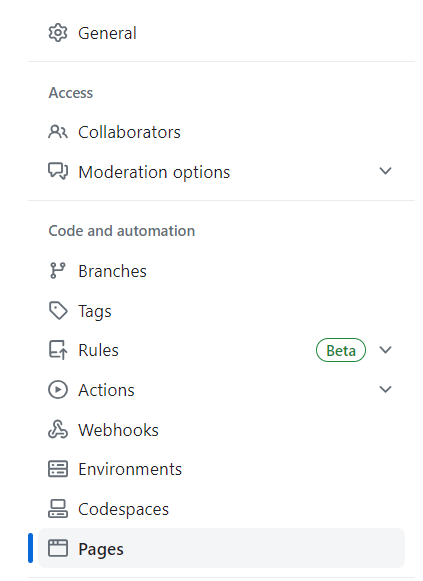
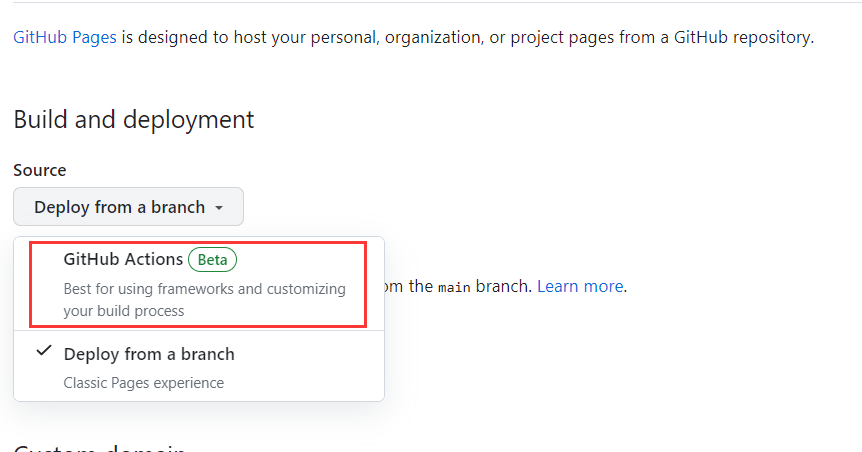
3.配置github仓库
进入Settings,在左侧选择Pages选项卡:
在右侧的Build and deployment 中选择 Github Actions
4.修改配置文件
主要修改._config.yml
要修改的的地方:
1
2
3
4
5
6
7
8
9
10
11
12
13
14
15
16
17
18
19
20
lang: zh-CN
timezone: Asia/Shanghai
title: Ding's Blog # it will display as the title
tagline: Reading, Coding, Thinking # it will display as the description
description: >- # used by seo meta and the atom feed
  A minimal, responsive and feature-rich Jekyll theme for technical writing.
url: "https://<username>.github.io"

github:
  username: <username> # change to your github username

social:
  # Change to your full name.
  # It will be displayed as the default author of the posts and the copyright owner in the Footer
  name: <name>
  email: <email> # change to your email address
  links:
    - https://github.com/<username> # change to your github homepage

avatar: assets/img/avatar.png # change to your avatar image
5.在本地测试运行效果
1
bundle exec jekyll s
或
1
bundle exec jekyll serve
就可以在http://localhost:4000访问网站查看效果
6.部署
1
2
3
git add .
git commit -m "message"
git push
远程仓库更新之后,等半分钟左右的时间,会自动完成部署。
创建新文章
在_posts/目录下创建新文章的.md文件就可以。为了方便,我在_drafts/目录下创建了一个模板文件,复制到_posts/目录下,修改文件名和内容就可以了。
图床
图片放在assets/img/目录下。对于每篇文章,单独创建一个文件夹。图片的引用路径为/assets/img/<文章名>/。目前这一操作需要手动完成。
文件
文件放在assets/file/目录下。
参考链接
Jekyll 的安装手册
https://jekyllrb.com/docs/installation/
chirpy的官方教程
https://chirpy.cotes.page/posts/getting-started/
文章内各种功能的语法
本文由作者按照 CC BY 4.0 进行授权